Can you believe Thanksgiving is just a little over a week away? To jolt myself into that realization, I took some time to play with tablescape options for Thanksgiving Day.
It's a lot of fun to mix patterns, textures and color combinations using placemats, napkins, napkin rings and dishes. And, it's all about personal preference - there's no right or wrong way to do it (in my opinion) - just find a combination that appeals to you.
For this tablescape, I set the table with four place settings, but will add more for our Thanksgiving meal.
I started with a square woven goldtone placemat as my foundation. They were purchased at Kohl's. Topping the placemat was a dark Fall charger with embossed leaves, for a definite touch of Thanksgiving. For more on these chargers, see my previous post HERE.
Next I added a white stoneware dinner plate. This basic white dinnerware set is so versatile and has been a great buy - it can be paired with most any color combination for any occasion. It is Red Vanilla Classic White stoneware from Overstock. You can find it HERE.
The salad plate is from an amber stoneware set that I bought years ago. It's our favorite everyday set. Unfortunately, it's no longer available but a somewhat similar (in color) set is available HERE.
The dinner napkins are Mainstays Tuscany napkins and are a wonderful combination of neutral tones mixed with deeper autumn colors. They can be found HERE. I folded them accordion style and slipped them thru the napkin rings. The flatware is tucked into the napkins and napkin rings - simple and easy.
The woodtone napkin rings with embossed autumn leaves coordinate nicely with the chargers and are available HERE.
Last but not least in the place setting, the beverage and wine glasses are near and dear to me. They are Mikasa Park Lane and now discontinued.
Now for the center of the table ...
The centerpiece is comprised (of course!) of items on hand. Starting at the very bottom, the base is a round rattan placemat with delicate scalloped edges. Am loving the rustic touch! Found them at Pier 1 a few years ago. They are great to use throughout the home.
On top of the rattan placemat is a gold framed round mirror repurposed as a tabletop tray. Bought the mirror from Target, but am not finding it online. Most mirrors can be used as trays - just be sure to add felt to the underside to protect your tabletop.
You may recall the natural leaf cone tree from my post HERE. It has surprisingly maintained its rusty brown leaf tones, which is perfect for Fall and Thanksgiving! The large leaf tree was placed on a pedestal and is surrounded by a smaller leaf tree and a monogram candle made by printing the monogram on tissue paper and decoupaging to a white pillar candle. You can find my tutorial on the tissue paper/decoupaging process HERE.
Also tucked into the vignette is a cute little faux burlap earthtone pumpkin found at Dollar Tree. Amazing texture and detail for an item that costs only $1!
For additional texture, around the mirror base I added assorted earthtone potpourri consisting of natural elements - miniature pinecones, leaves and seed pods.
The faux gold leaves scattered around the vignette were actually vibrant reddish orange when I bought them at Dollar Tree. To tone them down a bit and add some bling, I spray painted them with gold paint. The gold is a much better suited color in this tablescape and works well with the goldtone square placemats.
A package of Fall table scatter in shades of gold, orange and brown, was placed around the perimeter of the mirror tray. Very inexpensive and adds a fun touch!
Realistically, just before we sit down for our meal, we remove the centerpiece. This one will be easy to move to make room for tasty goodies!
Wishing you and yours a wonderful Thanksgiving Day! Thanks a bunch for joining me on this tour of our dining room tablescape!
Shared with:
It's really not your imagination - this is another post relating to cinnamon ornaments! The good news is that this one has awesome results!
If you missed my last two attempts at making cinnamon ornaments, you can read all about it HERE. (As an update to my previous post, after wiping the cinnamon salt dough ornaments with a damp sponge, in hopes of eliminating the chalky appearance, they did dry a tiny bit darker, but still not to my liking.)
So I changed gears and turned to a cinnamon applesauce recipe that I tweaked a bit.
Scented Cinnamon Ornament Dough
1 cup applesauce
1-1/4 cup ground cinnamon
1 tablespoon ground cloves
1 teaspoon ground allspice
Plastic drinking straw
Preheat oven to 200 degrees (Fahrenheit).
Line cookie sheets with parchment paper or spray cookie sheets with cooking spray.
Combine all ingredients ... except the straw! :)
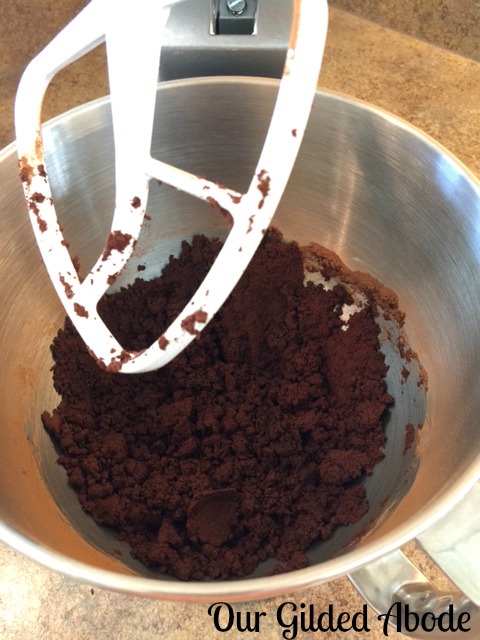
I used my stand mixer with a paddle attachment, but it's not necessary - you can mix easily by hand in a bowl with a large spoon.
The dough should form easily into a ball when rolled in your hands and if you find its a bit too dry or too sticky, incrementally add a little more applesauce (if too dry) or cinnamon (if too sticky).
Sprinkle your counter or work surface lightly with cinnamon and roll the dough out to 1/4". If you don't have a rolling pin, a large glass jar works well in a pinch.
Now for the fun part - select your cookie cutter shape and press into the dough.
Remove carefully from the work surface - a metal spatula sprinkled with cinnamon helps for lifting the dough easily from your work surface.
Place ornaments one inch apart on parchment lined or oil sprayed cookie sheets.
With the straw, poke a hole into each ornament.
Bake for 1-1/2 hours, turning halfway through baking process. Your entire home will smell so wonderful!
These turned out exactly as I had hoped - dark brown and gingerbread-like in appearance. The cinnamon salt dough that I had previously made resulted in much lighter colored ornaments.
To decorate, I added a few round dots at each corner of the star with white acrylic paint and an artist's brush, and tied a red/white grosgrain ribbon for hanging.
I'm so glad that I didn't give up on finding a dough recipe that worked well for me. If you try either of the versions - salt dough or applesauce dough - please let me know. Would love to hear how you like them!
Wishing you a creative day!
Shared with:
After getting into the holiday spirit by making the burlap and book page stocking ornaments (you can find my tutorial HERE), I had visions of making aromatic tree ornaments to fill our home with the seasonal scents of cinnamon and spices. There are tons of recipes online for cinnamon salt dough and all seemed super simple so I jumped right in.
The ingredients are basic - flour, salt, cinnamon powder (and a variety of spices) and water. All items we keep on hand in our everyday kitchens and pantries. And to think that these items could be miraculous turned into delightful ornaments for the holidays!
The equivalents varied by recipe, and the first recipe I tried (do you see where this is headed? LOL!) called for:
1 cup flour
1/2 cup salt
1/2 cup cinnamon powder
1 teaspoon ground nutmeg
3/4 cup warm water
I gradually added the water while stirring and it turned into a wonderful dough. Looked and smelled perfect.
Rolled out easily with a rolling pin and I used a cookie cutter to make scalloped round shapes. Used a drinking straw to create a small hole in each ornament for attaching a ribbon later.
Recipes varied on how to dry the ornaments - some air dried them on a cooling rack, turning them periodically. Others baked on a very low temp in the oven to dry.
With this batch, I air dried on a cooling rack.
They still looked wonderful and smelled fantastic! My hopes were high!
But, gradually as they dried, they turned powdery white. Not quite the golden brown, gingerbread appearance I was after.
Discouraged, but not one to give up on the first try, I whipped up another batch of dough using a different recipe. This time around, the ingredients were:
2 cups flour
1 cup salt
5 tablespoons cinnamon powder
1 tsp ground nutmeg
1 cup water
As before, the dough looked and smelled awesome. Having read that some had refrigerated their dough, I rolled it into a ball, covered with plastic wrap and refrigerated for 45 minutes.
Rolled it out and cut the ornaments and all was well. Went with the baking method this time around, and put the ornaments on a cookie sheet on parchment paper at a low temp (175F). Peered thru the oven window and, just minutes after being placed in the oven, they turned chalky white ... AGAIN!
I have no clue why this occurred and have only found one reference online from anyone who shares (or admits! LOL) that this has happened to them ... they didn't have a solution.
I experimented with applying Mod Podge on one dried ornament, hoping it would somehow darken the ornament surface. It didn't.
As a last resort, I used a wet sponge and have wiped the surface of the ornaments, fingers are crossed that when they dry again, they'll be golden brown and not chalky white.
Painting them is also an option so all is not completely lost.
Would love to hear your experiences with cinnamon salt dough and/or any ideas on how I can avoid this project fail the next time around. Thanks for any input!
In keeping with that whole "lemons to lemonade" thing, perhaps I'll just plan to put them on the Christmas trees as they are - they do smell wonderful - and look snow frosted! :)
How can something so decadent be so crazy simple to make? Looking closely at cobbler and all its fruity, doughy goodness, it's really hard to believe it doesn't take hours to create.
But, looks are definitely deceiving in this case. Before we go any further, I must warn you ... this recipe contains good, old fashioned butter. I'm from the South, did you really expect anything less? :)
A little twist on traditional peach cobbler is the addition of pears. This combination was an accidental discovery - when I discovered I didn't have two cans of peaches in the pantry!
If you're still with me, these are the ingredients:
- 1 stick (1/2 cup) butter
- 1 can sliced peaches (15 oz.)
- 1 can sliced pears (15 oz.)
- 1 cup self-rising flour
- 1 cup sugar
- 1 cup milk
- 1 tablespoon ground cinnamon
- Vanilla ice cream
Preheat oven to 375 degrees.
Melt butter (I used salted butter because it's what I had on hand) and pour into a 13" x 9" glass baking dish.
Add 1 can sliced peaches with liquid (do not drain). I used the version in natural juice.
Add 1 can sliced pears with only 1/2 can of liquid (do not use entire can of liquid).
In a bowl mix flour and sugar. Add milk and stir until batter is smooth.
Spoon batter over butter and fruit mixture, and sprinkle with cinnamon.
Bake for 45 minutes, or until top of cobbler is lightly browned.
Remove from oven and let sit 5 minutes then dig in! Best served warm with vanilla ice cream.
If you don't bake much and would like to boost your baking confidence, cobbler is a great recipe to start with. Hope you give it a try!
Shared with:
Recently I devoted time to deep clean our laundry room (click HERE to read all about it). Now with the room shiny and fresh, it was time to add a new touch of bling!
With no spend decor in mind, I "shopped" our home for items on hand. When I spotted wooden clothespins, I was reminded of all the clothespin repurposing projects and decor that I've seen online over the years.
The result ... I combined a gold trimmed black picture frame with white mat (glass removed), and three gold spray painted clothespins mounted with hot glue onto black card stock.
So sorry that I don't have photos of the "how to" to share but honestly this project went very quickly and is so simple!
First, I removed the glass from the picture frame and added a piece of black card stock, attaching it to the back of the white mat with two rows of double-stick tape on each side.
To spray paint the clothespins, I placed them in a cardboard box, sprayed one side and flipped them until all sides were painted.
This is the paint I used:
It was wonderful and covered the clothespins completely with just one coat.
Attached them to the card stock with hot glue and it was complete.
And here it is at home on the laundry room wall:
Have you used clothespins in decor or craft projects?
I'm enjoying the whimsy and simplicity of this project and, you can never go wrong with spray paint - especially blingy
gold!
Thank you to Brenda at Cozy Little House for featuring this post!~