It's starting to look and feel a lot like Christmas ... the presents are wrapped, the mantel is aglow, and our home is an explosion of glittery gold, bold red and deep green.
This year's mantel is decked out in three layers of garlands ... a base of vertically strung pinecones, and a lighted spruce garland, topped off with a gilded cascading garland. Instructions for the DIY pinecone garland are HERE.
Above the mantel, a traditional spruce wreath with gold and red ball ornaments is surrounded by a gold open picture frame and a symmetrical arrangement of glittery cutout gold stars and red trees, red felt cone trees, and copper lanterns filled with gold wrapped candles.
A splash of red also warms the hearth area - this darling wood step stool painted with shiny red enamel was built by hubby's grandfather many years ago and is the perfect perch for the vintage red truck and tree. Surprisingly, our gold painted Thanksgiving pumpkin appears to be alive and well to shine on through Christmas.
On our coffee table, a large clear glass cloche filled with red glass ball ornaments is resting on a gold framed mirror tray. In reality, it's not a tray at all - it's a wall mirror found at Target. Nice when items can do double duty.
Accompanying the cloche is a little red lighted vehicle with Christmas tree. It was originally green and received a festive makeover with red paint. Read more about that HERE.
The two
slipper chairs in the living room are adorned with red rosette pillows,
and my thrifty find of the season ... a dark grey plush throw with super
large fluffy pom poms. I was thrilled to find it at Tuesday Morning
for only $14.99!!! If you're searching for these, they also had them in
ivory and a light tan.
In a break from tradition, this year's large living room tree is decorated all in gold, with burlap garland and gold raffia. It rests in a burlap filled galvanized container. To see how we set up the tree container, click HERE.
The topper is a gold star with white lights, and glittery gold cascading sprays. The sprays were found at Lowe's and the star topper at Target. Tree ornaments were all items we had on hand.
Instructions for making the burlap and book page stocking ornaments can be found HERE.
The foyer
decor (adjacent to the large tree) is simple and consists of a
lighted tabletop urn centerpiece on the foyer table, and a simple door wreath.
Our gift wrapping color theme this year is a combination of metallic gold, white and black. I created and cut the gift tags from black card stock using my Silhouette Cameo, and shiny gold paper fills cutout tree openings in the tags.
Names were written on the tags with a metallic gold Sharpie (from Lowe's).
In the dining room, a new addition this season is the hot beverage bar on the small antique chest. The chest is just the right size for all the goodies needed to enjoy a hot cup of coffee, tea, spiced cider or cocoa. In addition to the Keurig and K-cups, add-ins are ready to go - chocolate chips, marshmallows, flavored coffee creamer, sprinkles, candy cane stirrers and cinnamon.
The dining room table centerpiece is another large glass cloche, filled with red and gold glass ornaments and surrounded by gold and red beaded garland. This cloche is displayed on a farmhouse style carved round wood tray with metal handles. The tray was from Decor Steals and came in a set of two.
A counter height bar separates our kitchen from our dining room and it's a great place for two lighted 4' counter trees in urns. They're decorated with the handmade cinnamon ornaments from last year (instructions found HERE and HERE).
Next to each lighted counter tree are small gold metal ornament stands loaded with red and gold ornaments and "skirted" with red berry candle rings. The gold metal stands were Goodwill finds this summer.
If you're still with me, have you noticed that pillows move around a lot in our home? :)
In the kitchen, we continue the explosion of festive red. Our kitchen is typically very neutral and at Christmas the red really makes it come alive.
The light fixture above the island is dressed up a bit with green garland and red and gold tinsel wreaths. A similar wreath is also centered on the garland at the kitchen sink window.
Our framed Christmas countdown is in full swing on the kitchen counter, along with a mug of hot cinnamon flavored candy canes in a holiday mug perched on a white and gold dotted cupcake pedestal. A trio of glittery gold cone trees add a little sparkle to the top of the fridge.
The trio of cracked glass lighted orbs on the counter remain year-round because we enjoy them so much.
A white ceramic soup tureen is great for displaying Christmas crackers/poppers (which do you call them?) until Christmas day and a chubby little Santa is keeping them company.
Wrapping up this holiday tour, our master bedroom has a touch of glitz in the form of tinsel trees and matching gold wreath.
How is your holiday decor coming along? Are you just beginning to decorate, shop for gifts and plan your menu? Or, have you finished and are now breathing a sigh of relief?
Your comments are greatly appreciated and I look forward to your thoughts
and ideas! I try to respond to comments via email as soon as I can. If
your email address isn't available, I will comment here. Thanks so much
for visiting!
Shared with:
Do you serve a traditional New Year's dish to bring prosperity and good luck? Here in the South, one traditional dish is black eyed peas. To make them a little more fun and appealing, I made glitzy New Year's clock face plates on which to serve them.
Supplies used:
Clear glass plates
Clock face graphic
Mod Podge or white glue
Before we get started, I must give credit for the amazing clock face graphic to The Graphics Fairy. Karen has a seemingly endless variety of graphics available free for your personal use and the one I used, along with two additional options, are found HERE. You'll also find many shared project ideas for the free graphics she graciously provides. Please check out her site - you will be impressed!
To create the clock face plate, I measured the diameter of the inside center of the clear plate. These are salad plates, but dinner plates can easily be used by printing a larger clock face to fit the center area.
This is the graphic I selected:
After printing the clock face on my color printer, I cut it out and applied Mod Podge to the front (clock face side) of the image. Then, carefully placed it on the back side of the clear plate and used an old gift card to smooth out any air bubbles. Let dry.
The glue dries clear and only the gorgeous clock face image will be seen from the front side of the plate. I'm loving the combination of black, cream and metallic gold tones.
Paired with gold chargers, the clock face really "pops" against the gold. For texture ... a table centerpiece comprised of everything gold (repurposed from Christmas). Will later add napkins, silverware and glasses to complete the tablescape.
This is a very quick project and adds a nice touch of glitz to New Year's. The clock face images are certainly not permanent and can be removed quite easily by soaking in warm soapy water.
For those with limited storage space, this can be a great alternative to buying occasion-specific dinnerware - just use the same set of clear plates and change out the design with each holiday or occasion. It really takes little time at all!
Wishing you a fun-filled and Happy New Year!!!
Can you believe Thanksgiving is just a little over a week away? To jolt myself into that realization, I took some time to play with tablescape options for Thanksgiving Day.
It's a lot of fun to mix patterns, textures and color combinations using placemats, napkins, napkin rings and dishes. And, it's all about personal preference - there's no right or wrong way to do it (in my opinion) - just find a combination that appeals to you.
For this tablescape, I set the table with four place settings, but will add more for our Thanksgiving meal.
I started with a square woven goldtone placemat as my foundation. They were purchased at Kohl's. Topping the placemat was a dark Fall charger with embossed leaves, for a definite touch of Thanksgiving. For more on these chargers, see my previous post HERE.
Next I added a white stoneware dinner plate. This basic white dinnerware set is so versatile and has been a great buy - it can be paired with most any color combination for any occasion. It is Red Vanilla Classic White stoneware from Overstock. You can find it HERE.
The salad plate is from an amber stoneware set that I bought years ago. It's our favorite everyday set. Unfortunately, it's no longer available but a somewhat similar (in color) set is available HERE.
The dinner napkins are Mainstays Tuscany napkins and are a wonderful combination of neutral tones mixed with deeper autumn colors. They can be found HERE. I folded them accordion style and slipped them thru the napkin rings. The flatware is tucked into the napkins and napkin rings - simple and easy.
The woodtone napkin rings with embossed autumn leaves coordinate nicely with the chargers and are available HERE.
Last but not least in the place setting, the beverage and wine glasses are near and dear to me. They are Mikasa Park Lane and now discontinued.
Now for the center of the table ...
The centerpiece is comprised (of course!) of items on hand. Starting at the very bottom, the base is a round rattan placemat with delicate scalloped edges. Am loving the rustic touch! Found them at Pier 1 a few years ago. They are great to use throughout the home.
On top of the rattan placemat is a gold framed round mirror repurposed as a tabletop tray. Bought the mirror from Target, but am not finding it online. Most mirrors can be used as trays - just be sure to add felt to the underside to protect your tabletop.
You may recall the natural leaf cone tree from my post HERE. It has surprisingly maintained its rusty brown leaf tones, which is perfect for Fall and Thanksgiving! The large leaf tree was placed on a pedestal and is surrounded by a smaller leaf tree and a monogram candle made by printing the monogram on tissue paper and decoupaging to a white pillar candle. You can find my tutorial on the tissue paper/decoupaging process HERE.
Also tucked into the vignette is a cute little faux burlap earthtone pumpkin found at Dollar Tree. Amazing texture and detail for an item that costs only $1!
For additional texture, around the mirror base I added assorted earthtone potpourri consisting of natural elements - miniature pinecones, leaves and seed pods.
The faux gold leaves scattered around the vignette were actually vibrant reddish orange when I bought them at Dollar Tree. To tone them down a bit and add some bling, I spray painted them with gold paint. The gold is a much better suited color in this tablescape and works well with the goldtone square placemats.
A package of Fall table scatter in shades of gold, orange and brown, was placed around the perimeter of the mirror tray. Very inexpensive and adds a fun touch!
Realistically, just before we sit down for our meal, we remove the centerpiece. This one will be easy to move to make room for tasty goodies!
Wishing you and yours a wonderful Thanksgiving Day! Thanks a bunch for joining me on this tour of our dining room tablescape!
Shared with:
After mentioning in my last post the virtues of using natural leaves to make wonderful cone trees, I decided to take my own suggestion and make one!
With Fall around the corner, fallen leaves will soon be in abundance. Sadly, one of our shrubs was sickly and didn't make it through our months of triple digit temps and scarce rain, so we now have a supply of leaves readily available.
I picked a small pail full of dry leaves in varying shades from greenish to burnt orange in color and checked them over carefully to ensure they were insect-free. Didn't want to give any lazy critters a free ride into our home!
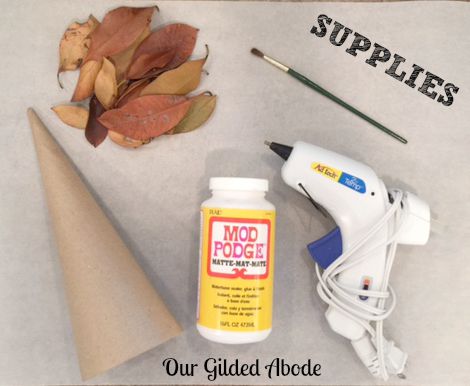
The supplies I used were:
~~Cardboard (paper mache) cone
~~Natural leaves
~~Hot glue gun (to attach leaves to cone)
~~Matte Mod Podge (to seal leaves)
~~Soft artist's brush
To begin, I clipped the stems from each leaf to enable them to lay a little flatter against the cone. Then cut several leaves in half lengthwise and hot glued the halves around the entire base of the cone horizontally to cover about 1/2 inch from the bottom of the cone. This will prevent any spaces of cardboard (paper mache) showing thru the leaves along the first row of vertical leaves.
At this point, I just began hot gluing the leaves to the cone vertically, slightly overlapping the sides of the leaves. I only placed hot glue on the upper half of the leaf.
Repeated this process for the remaining rows.
For the very top of the cone, I used a flexible leaf and wrapped it around the tip to form a point, hot gluing it in place.
To seal the leaves, I gave the leaf covered tree a coat of Mod Podge in Matte using a soft artist's brush. In hindsight, it would have been best to apply the Mod Podge to both sides of the leaves (and let dry) before gluing them to the tree with hot glue. The Mod Podge is supposed to seal the leaves and helps prevent them from becoming brittle. I've read that hairspray can also be used as a sealer.
I think the natural color really does provide a nice touch of Fall, don't you? Will keep you posted on how the color changes as the leaves age. Have you used natural leaves in décor? Have you found they age well? What other natural elements have you used?
Thank you to Must Love Home and Dear Creatives for graciously featuring this post!
It feels a bit odd preparing for Fall while our temps have been in the triple digits, but I'm excited about all the natural elements and warm earthy décor that come with Fall decorating.
This weekend I gathered the cone trees that I've made to display throughout our home and wanted to share with you a few options for making them.
From left to right above, the trees are made using tea stained book pages, soft yellow twine, drop cloth strips, and natural jute string. I can't take credit for the large grapevine cone tree - it was purchased at Hobby Lobby.
To make the string and twine trees, use a cardboard cone and starting at the tip of each cone and, using a hot glue gun, wrap the string or twine around the cone, leaving no gaps between the rows. When shopping for string and twine, check all store departments - other than the crafting and home improvement sections, they can also be found in gardening and sporting goods. And, if you don't find them in a color you need, as with most elements, they can be spray painted, brush painted, and even stained.
For the drop cloth tree, cut 1" x 3-1/2" strips from the drop cloth, form them into loops and, starting at the bottom of the Styrofoam cone, pin them to the cone using straight pins. I wrapped the tip of the cone with string and topped it with a wood finial.
To make the book page tree, cut 1" x 1-1/2" strips from book pages and attach them to the cardboard cone in rows using double-stick tape. I used tea stained book pages for my strips and if you missed the tutorial on tea staining, you can find it HERE. If you like, you can also curl the ends by rolling each book page strip on a pencil or pen, unrolling and attaching to the cone.
Another option is to cover a cone with burlap strips. For this one, I attached burlap strips to a Styrofoam cone using a low temperature hot glue gun, then spray painted the burlap with gold spray paint.
If you don't have access to cardboard or Styrofoam cones, you can easily make them from posterboard or cardstock. There are many templates online - just do a quick search for "cone shape template."
The possibilities are also endless when it comes to decorating cones - you can use beads, beans, pine cone scales, design paper, fabric, glitter, ribbon, moss, raffia, etc.
A good starting point is to set a color scheme and then search for items in those colors.
Especially for Fall, leaves from a shrub or tree work really well and if they're not quite the color you're looking for, they can be spray painted. Just drop them in a cardboard box, using one hand to apply the spray paint and the other to shake the box while spraying so the leaves are evenly coated.
One last tip - when using Styrofoam cones and a glue gun, always use the low temperature setting - high temperature glue can melt the cone. Don't ask me how I know this! :)
Are you ready for Fall? We're looking so forward to consistently cooler weather ... and much needed rain!
Thank you to Craftaholics Anonymous, A Delightsome Life, Work it Wednesday, Imparting Grace, The Interior Frugalista and Cozy Little House for graciously featuring this post!