Pages

Free Printable - Fall Themed Christmas Countdown

Each year at this time I'm excited to display our festive red framed Christmas countdown printable in our kitchen.  But, this year I also wanted a Fall themed countdown.  


Using Picmonkey I was able to create a reusable countdown that can be displayed through Thanksgiving.  It's nice to have a reminder of how much time we have until Christmas, without neglecting the Fall season and Thanksgiving.

And, I'm happy to share the free printable with you.  It's formatted for an 8"x10" frame or mat.  Just print, frame and use a dry erase marker on the outside of glass to write in the number of days until Christmas.


To download and print, click HERE.

If you have any problems downloading, please email me or leave a comment with your email address and I will forward the file to you.

You can find the number of days until Christmas HERE.


Your comments are greatly appreciated and I look forward to your thoughts and ideas!  I try to respond to comments via email as soon as I can. If your email address isn't available, I will comment here. Thanks so much for visiting!


Shared with:

Travel Trailer Tour

I promised a tour of our travel trailer and ... here we go!

Before we made our purchase, we browsed the photos of many other bloggers' travel trailers, and now it's a pleasure to return the favor and provide this quick tour of ours.  

Our travel trailer is a Rockwood Mini Lite model 2109s and is approximately 21 feet long.  It's basically a one room (plus bathroom) tiny house on double axles!  For a more detailed list of features, check out my previous post HERE.  


To begin this tour, as you walk through the entry, to the right mounted to the side of an upper cabinet is the monitor panel/command center.  Here you control the water pump/heater, tank heaters, and monitor the tanks.  This is also where you find the controls for the power awning and slide-out, and all exterior lighting, along with the interior light nearest the entry.


To your left is a floor to ceiling pantry.  It has removable, adjustable wood shelves.  There's also a clothing rod, making the closet easily converted to a wardrobe if needed. 


Next to the pantry are the refrigerator and freezer.  Below the fridge is a carbon monoxide and gas detector, and the converter for switching the fridge/freezer from AC to propane power.  


Immediately in front of you is the bathroom door - how's that for convenience?  :) 

Turning to the right you arrive at the kitchen area and basically the remainder of the entire space ... sitting area and bedroom area.

The kitchen is actually quite spacious for a trailer this size.  There's a built-in microwave, exhaust fan/light, built in oven/3-burner stove and double sink.  


The little "This is our happy place" printable with camper graphic was fun to make.  Links to graphics can be found HERE.


It offers plenty of storage - upper cabinets, two large drawers (for pots/pans and larger items), a tray drawer under the sink, two cutlery drawers to the left of the oven, and a large drawer below the oven.


We replaced the drawer pulls on the two largest kitchen drawers with larger and sturdier cup pulls.  

Satin Nickle Arched Cup Pull


Under the cutlery drawers is the furnace.  To the left of the kitchen counter is extra counter space in the form of a hinged shelf that pops up. 

Next to the kitchen is the entertainment center with full digital stereo system, including outside speakers and remote.  The flat screen TV swivels for viewing in the bedroom or sitting area.   

The stereo can also be used as an MP3/DVD/CD player and any other external devices hook up to the stereo as well.  Under the stereo is a charging station with outlets for phone charging.  Nearest the floor is another storage cabinet.  In spite of its small footprint, this space really isn't lacking storage options.


The TV can also be moved to the exterior of the trailer for outside viewing.  The speakers on the exterior are under the awning right above the window (the two round objects on either side of the orange porch light).  

Source


Back inside, the bedroom area has drapes on either side of the queen size bed, enabling you to separate the sleeping area from the remainder of the space.  


We really enjoy having the large window at the head of the bed - it provides awesome lighting during the day and the window shade and exterior window cover can be closed for room darkening.  We were told that some manufacturers are discontinuing this window option.

On either side of the bed are built-in night stands - one side has a drawer and the other has a handy electrical outlet.

There are "closets" on both sides of the bed and storage above.  Adding these hanging organizers helps to keep folded clothing sorted and organized.


There's under bed storage at the foot of the mattress - you lift the end of the mattress to access a trunk size storage space, in addition to three built-in drawers.  


The mattress (which comes with a built-in heater) wasn't the most comfortable we'd experienced, so we added a 4" memory foam topper and now it's super comfy.  A great modification!


There was a single under cabinet light fixture mounted above the head of the bed, and we added puck lights for nighttime reading and to light the bedside tables.  


Puck lights were also installed above the monitor panel/command center near the entry door, and under the bathroom medicine cabinet to better illuminate the sink. 

These puck lights are LED remote control battery operated with dimmer and they are working really well.  They're from Costco and a set of 6 with remote was around $20.  


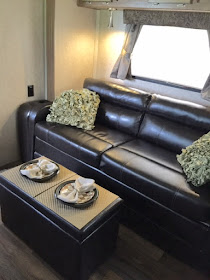
The sitting area is in the slide-out and contains a sofa bed with storage above and there are reading lights mounted under the upper cabinets.  Other models featured a dinette in the slide-out.


We added the storage ottoman and it's convenient for safely stashing away horizontal surface items (coffee maker, toaster, framed photos and breakable items) while on the road.  

A folding table was included with the trailer and was tucked away behind the sofa.  For us, it was a little too bulky and tall (and heavy for me), and took up too much floor space - especially when the pups are traveling with us.  It's a well made table - we'll use it outdoors for added prep or serving space when grilling.

Here it is .. to give you an idea of size:


That brings us back to the bathroom.  It's a 3 piece bathroom with sink, toilet and circular shower with shower doors.  There's a mirrored medicine cabinet above the sink, storage below the sink, and a skylight above the shower. 


That completes the tour of the interior!  Hope this helps if you're in the market for a similar size travel trailer and are comparing options and features.  If we can answer any questions about this model, please leave a comment or email and we'll be happy to help.  

And just so we don't end this tour with a photo of the toilet (!!) ... here's a lovely pic from our recent West Coast road trip - a view of the Picacho Mountains near Eloy, Arizona.  You can read all about our adventure HERE


Your comments are greatly appreciated and I look forward to your thoughts and ideas!  I try to respond to comments via email as soon as I can. If your email address isn't available, I will comment here. Thanks so much for visiting!

Shared with:

Our First Travel Trailer Road Trip

We are back home from our very first road trip with our new travel trailer! This trip took us from our home near Houston, Texas, to the Pacific Coast - over 3,000 miles in 11 days.  We saw so many beautiful sights - white sand deserts, amazing mountains and valleys, clear lakes and colorful sunsets.  And, our trailer provided a comfortable and familiar escape at the end of long days of traveling and sightseeing.   


To make our first trip even more interesting, we had a few passengers on board - our two pups - Mia and Shelby.   


This was their first ever road trip and they did great.  Traveling with pups (especially two rather large ones) makes for an entirely different type of trip, but it was a lot of fun.  Rest break locations along the way were determined by the existence of grass or landscape mulch!

We agreed that this first trip, our major focus would be to relax, become familiar with our new trailer and acclimate ourselves to camp set-up/breakdown routines.  

We're happy to report that we had pleasant stays at all of the campgrounds we stayed at - with the exception of Mother Nature being a little vocal at our last stop.  

Bottomless Lakes State Park - Roswell, NM


This was our first stop and we arrived well after dark the first day.  

The park is absolutely beautiful and the lakes are clear and clean.  The campgrounds were quiet this time of year (after Labor Day) and we enjoyed taking the pups for a swim in the cool lake and walks around the park the two days we were there.  


Our campsite was surrounded on two sides by hills.   


The  extraterrestrial town of Roswell is only 15 miles away and offers lots of restaurant, shopping and fuel options - along with their famous Alien Museum.

We discovered that raccoons are abundant after dark and not at all shy about letting you know you're visiting THEIR home.  :)


Lazydays KOA Campground - Tucson, AZ  


This campground was super clean, entirely paved and meticulously landscaped with native plants.  Each site also has citrus trees loaded with lemons, limes, oranges and grapefruit.  We enjoyed this location so much that we stayed again on our return trip home.  The campground restaurant really came in handy on our one night stays - no need to unhitch the tow vehicle to search for a restaurant for dinner.

Their fenced dog park was the nicest we encountered on this trip - so unusual to find grassy areas in the desert, but their spacious park was all grass, with shade trees.  The pups thought they were back at home and didn't want to leave.  

The campground features these unique covered solar structures that shade over 2 acres. 


Canyon Trail RV Park, Boulder City, NV


This campground is located five miles from Lake Mead and Hoover Dam and one hour from Las Vegas.  Very well maintained and two fenced dog parks (sand - no grass).   

The hot gravel and asphalt surfaces proved to be a bit of a challenge for getting two 60# pups to the dog parks.  Fortunately, we did so with no pad burns.  

And, we even squeezed in a day trip to Vegas.  We saw the filming location for Pawn Stars and hubby got a chance to tour Count's Kustoms as we celebrated his birthday while on the road.

The views from the campsite were stunning!


Santee Lakes Recreation Preserve - Santee, CA


This was our ultimate destination and 3 night home base as we explored San Diego and the Pacific Coast Highway.  This campground is a favorite of locals and the lakes are filled entirely with recycled water.  They're also stocked with fish year round.

All of the beaches along the PCH were amazing and Laguna Beach did not disappoint.


We found the San Diego area to be extremely pet friendly and the pups had fun romping and playing in the surf at Ocean Beach Dog Beach - one of the first off leash beaches in the US.  

They also enjoyed dining with us at beach cafes, coffee bars, and a really cute cafe along the PCH - the 101 Cafe.  


At Day Break Island Grill, they enjoyed their own meal ...


They were totally spoiled on this trip!

Returning home took us through the lush green fields of the Imperial Valley of California, to Tuscson for another one night stay at the relaxing Lazydays KOA Campground and through the beautiful Guadalupe Mountains to Carlsbad NM.

Carlsbad KOA - Carlsbad, NM


Our overnight stay in Carlsbad was a bit too exciting - we were entertained by a lightening and hail storm that passed through late evening producing golf ball size hail.  Thankfully, no one in the campground was injured and we were blessed with no broken trailer windows or visible travel trailer roof damage (will have it inspected).  Our truck didn't fare as well and sustained quite a bit of hail damage but gratefully, no broken windows.  

Except for the noise of the storm (!!), this was the quietest park we stayed in.


After 11 days on the road, we feel we have a good foundation for setting up camp (in total darkness even!) and breaking down camp (checklists are invaluable).  It also gave me a good idea of which items to pack for future trips, and which items I packed that proved to be totally unnecessary. 

We met lots of really nice fellow campers along the way and look forward to hitching up soon for a weekend getaway!


Your comments are greatly appreciated and I look forward to your thoughts and ideas!  I try to respond to comments via email as soon as I can. If your email address isn't available, I will comment here. Thanks so much for visiting!


Shared with: