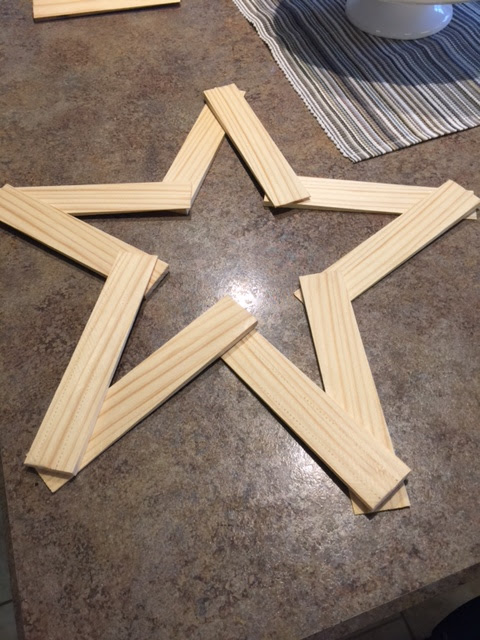
Items needed:
- 10 wood shims (8" long)
- Binder clips
- Tack nails
- Upholstery nails
- Craft paint in Vanilla
- Craft paint in Pearl White
- Craft paint in Bittersweet Chocolate
- Burlap ribbon
Begin by arranging the wood shims to form a star shape with 5 points.
When you're pleased with the shape, use binder clips to secure the wood shims in place prior to nailing.
At this point, it's a good idea to accept that the star shape won't be totally and completely perfect - rustic is the look we're after. :)
And, you'll still have time to tweak the shape just before you put the final nails in place.
Nail one tack nail at each point where wood shims meet.
My nails were a bit too long so, using the hammer, I bent them over on the underside.
When each point was secured with a nail, I rechecked the shape and then added 1 more nail to each point to further secure it.
After a base coat of Vanilla craft paint, and a top coat of Pearl White, I dry brush distressed the star with Bittersweet Chocolate craft paint with the same method I used for our DIY Distressed Tabletop. You can find the tutorial HERE.
The finishing touch was to add upholstery nails to each point.
To provide a little texture, a length of burlap ribbon was looped through the top point of the star and serves as the hanger.
If you're hanging the star indoors or in a mild climate, wood glue or hot glue could be used in lieu of the nails. Our front door is exposed to full afternoon sun and hot glue does not hold up well to our sweltering summer temps.
Wouldn't this be fun with larger wood shims, or longer and wider strips of wood?
And, they'd be so cute painted gold or with metallic colors.
Do you have fun plans for the Fourth of July? Our little community has an annual picnic and this year will be the 114th celebration! It's small town fun ... spent with friends and neighbors, enjoying good food, music, an auction and a cake walk. Wishing you a Happy Fourth!
Your
comments are greatly appreciated and I look forward to your thoughts
and ideas! I try to respond to comments via email as soon as I can. If
your email address isn't available, I will comment here. Thanks so much
for visiting!
Shared with:
Domestic Charm
Poofing the Pillows
Life with Lorelai
A Stroll Thru Life
My Paper Craze
Sew Can Do
The Dedicated House
DIY ShowOff
Savvy Southern Style
Dear Creatives
Cozy Little House
Poofing the Pillows
Life with Lorelai
A Stroll Thru Life
My Paper Craze
Sew Can Do
The Dedicated House
DIY ShowOff
Savvy Southern Style
Dear Creatives
Cozy Little House


What a great idea! You could paint it gold and use it for Christmas, too!
ReplyDeleteGreat idea Bless. Or gold glitter paint.. Pretty.
DeleteHi, Bless! How are you today? Hope your temp is less than 100 for the weekend - it's been awfully hot in your area. Thanks for your comment - great idea to make the stars for Christmas and paint gold. Wouldn't they also be cute made from popsicle/craft sticks and painted gold as tree ornaments?
ReplyDeleteWhat a cute and clever project. Thank you so very much for sharing this wonderful post at Thoughts of Home on Thursday.
ReplyDeleteThis is so cute!
ReplyDeleteYou have inspired me to give it a go.
Thank you for joining Thoughts of Home.
Carolyn, what a cute/cute idea.. Love it. I wonder could you use the paint stir sticks and cut to the length you want???
ReplyDeleteYou come up with the cutest ideas.. Thank you for sharing.
Happy July 4th to you and your family.