DIY Patriotic Wood Plaque

I have another star spangled project to share with you - a super quick and easy DIY patriotic wood plaque ...


Materials:


The plaque is a 12" x 9-1/2" (actual size) scrap piece of board that was leftover from our DIY Wood Plank Lighted Headboard Project ... check out the details HERE.

Lucky for me, the plaque was already stained in Dark Walnut and only need a few touch ups.  

To begin, print the Pledge of Allegiance that Kara at Creations by Kara so graciously provides free for our personal use.  Be sure to also check out her design for a framed pledge with flag that's so adorable!

Print and cut out the Pledge of Allegiance and mount to the center of the plaque with double stick transparent tape.


 Next, cut the paint sticks to form a frame around the Pledge.  


Paint the stir sticks.  For a dark brownish red, I mixed Tuscan Red and Metallic Brown craft paint.  Let dry.


Attach painted stir sticks to plaque using hammer and small tack nails.


Paint the wood star using Navy paint.  When dry, brush on a top layer of coarse gold glitter and let dry.


Attach star to center of pledge with 4 layers of foamy double-stick tape to give the star a raised appearance.


At this point you could attach a picture hanger to the back of the plaque for wall display, or do as I'm doing and pop it into an easel.

This took about 2 hours to complete - including paint drying time.  Love those quick and easy projects!


Your comments are greatly appreciated and I look forward to your thoughts and ideas!  I try to respond to comments via email as soon as I can. If your email address isn't available, I will comment here. Thanks so much for visiting!

Shared with:

DIY Wood Shim Star

The Fourth of July is just around the corner and this rustic DIY wood shim project adds to the star spangled festivities!


Items needed:

  •  10 wood shims (8" long)
  •  Binder clips
  •  Tack nails
  •  Upholstery nails
  •  Craft paint in Vanilla
  •  Craft paint in Pearl White
  •  Craft paint in Bittersweet Chocolate
  •  Burlap ribbon


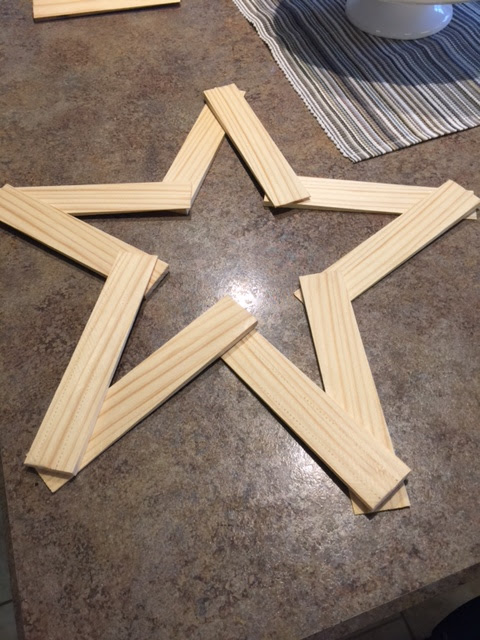
Begin by arranging the wood shims to form a star shape with 5 points. 


When you're pleased with the shape, use binder clips to secure the wood shims in place prior to nailing.  

At this point, it's a good idea to accept that the star shape won't be totally and completely perfect - rustic is the look we're after.  :)  

And, you'll still have time to tweak the shape just before you put the final nails in place.


Nail one tack nail at each point where wood shims meet.


My nails were a bit too long so, using the hammer, I bent them over on the underside.

When each point was secured with a nail, I rechecked the shape and then added 1 more nail to each point to further secure it.

After a base coat of Vanilla craft paint, and a top coat of Pearl White, I dry brush distressed the star with Bittersweet Chocolate craft paint with the same method I used for our DIY Distressed Tabletop.  You can find the tutorial HERE.  

The finishing touch was to add upholstery nails to each point. 

To provide a little texture, a length of burlap ribbon was looped through the top point of the star and serves as the hanger.


If you're hanging the star indoors or in a mild climate, wood glue or hot glue could be used in lieu of the nails.  Our front door is exposed to full afternoon sun and hot glue does not hold up well to our sweltering summer temps.

Wouldn't this be fun with larger wood shims, or longer and wider strips of wood?

And, they'd be so cute painted gold or with metallic colors.


Do you have fun plans for the Fourth of July?  Our little community has an annual picnic and this year will be the 114th celebration!  It's small town fun ... spent with friends and neighbors, enjoying good food, music, an auction and a cake walk.  Wishing you a Happy Fourth!


Your comments are greatly appreciated and I look forward to your thoughts and ideas!  I try to respond to comments via email as soon as I can. If your email address isn't available, I will comment here. Thanks so much for visiting!


Shared with:


Father's Day Chalk Art

Just a quick post to share with you an easy Father's Day stenciled chalkboard sign that's a fun and bright way to celebrate Dad on his special day!


This adorable lighted, distressed chalkboard easel was a thoughtful gift from our sweet daughter that she found at Kirkland's.  :)

And the chalk art design is another Silhouette Design Store regular cut file that I purchased and cut out of white Contact paper to use as a removable, adhesive stencil.  


Silhouette Design Store

For this sign, I bravely drew the double-lined border at the top and bottom of the chalkboard - free hand!  It's not perfect, but "good enough" is my new perfect.  Works for me!

After drawing the border, I placed the contact paper stencils (again separating the design into two cut pieces) on the chalkboard.  For more details, click HERE to see my previous DIY Chalk Art post.

Using a chalk marker, I filled in the open areas of the stencil, removed the stencil and cleaned up any smudges with a slightly damp artist's brush.


It took all of about 30 minutes to do - including cut time.  Quick and easy!  


If you don't own a Silhouette Cameo cutter, you can achieve similar results by printing a design on cardstock, cutting it out manually with scissors, and tracing the design onto Contact paper. 


Or, you can use cardstock as the stencil (skipping the Contact paper step), but for me I've found that I need the self-adhesive stencil to get a clean line while tracing.


Hope you enjoyed this quick and easy Father's Day chalk art.  What plans do you have for the "king of your castle?"  We'll be showering dear hubby with lots of attention and much deserved food and desserts! :)


Your comments are greatly appreciated and I look forward to your thoughts and ideas!  I try to respond to comments via email as soon as I can. If your email address isn't available, I will comment here. Thanks so much for visiting!


Shared with:

DIY Chalk Art

A couple of years ago I found this framed marker board at Home Goods and have been using it as a backdrop above our fireplace for mantel wreaths ... until now!


For this project, I used:
  • Framed marker board
  • White chalk marker
  • Silhouette Cameo cutter
  • White contact paper
  • Ruler
  • Silhouette design - "It's a good day ..." phrase
  • Stiff artist's brush
  • Plastic stencil - half circle and circle


Knowing the limits of my artistic ability and that I would need a stencil, I browsed through the Silhouette Design Store and the phrase "It's a good day to have a good day" immediately made me smile, so I put the cut file in my online cart, paid 99 cents, and it was mine.

To begin, I used a ruler and drew chalk marker double lines along each side of the marker board to form a chalk "frame."  Then used a plastic stencil to add open half circles and smaller circles at each corner and at the center of each side.  

To remove the chalk where lines intersected and overlapped, a slightly damp artist's brush worked well without disturbing other areas of the design.


Next, opening the cut file in my Silhouette software, resized it to 12" wide and ungrouped it to cut "It's a Good Day to Have a" ...


... and "Good Day" separately for ease of handling.


After cutting the two pieces using white contact paper, I removed the letters and design from the paper backing and was left with an adhesive stencil.

I removed the stencil from the paper backing and placed it carefully on the marker board, being sure to press it down firmly to eliminate any gaps.  


Finally .. the fun part ... filling in the stencil using the chalk marker!


Instead of filling in each letter solidly with chalk, I mixed it up a little by alternating diagonal lines and dots.  Just a bit of visual interest, don't you think?  Can you spot the areas that still needed touching up?  There are a lot!


Of course, after "finishing" it, I had to tweak it by adding a scroll design to fill the blank space between the two portions of the phrase.  

NOW, it's complete!


Have you tried your hand at chalk art on a marker board or chalkboard?  Did you use a stencil or are you artistically inclined and can do it freehand?  


Your comments are greatly appreciated and I look forward to your thoughts and ideas!  I try to respond to comments via email as soon as I can. If your email address isn't available, I will comment here. Thanks so much for visiting!


Shared with: