Summertime Pup Treats

With summertime heat index temps in triple digits, our furry family members welcome frozen treats!


This time of year our pups don't linger when they go outside - they rush back inside to be cool.  But, they'll stay out a few minutes longer to devour a cold frozen treat.


Ingredients:
  • 1 can 100% pumpkin (not pie filling)
  • 1/4 cup oats
  • 1/4 cup peanut butter
  • 1 mashed ripe banana

Combine all ingredients.


Spoon into ice cube tray.  Freeze and serve.  Makes 12 frozen treats.


Hope your furry family members enjoy these as much as ours do!


Your comments are greatly appreciated and I look forward to your thoughts and ideas!  I try to respond to comments via email as soon as I can. If your email address isn't available, I will comment here. Thanks so much for visiting!

Freezing Fresh Basil

Thanks to the DIY Wood Planter Boxes we made for our oldest son's birthday earlier this year (and his major green thumb!), we now have a nice supply of frozen basil leaves ready for use.


We don't have a garden, but when we're fortunate to receive gifted fresh veggies, fruit and herbs, those that we aren't able to eat are frozen to be enjoyed later.

Fresh basil is a great herb to freeze and it takes just a few easy steps to take them from garden to the freezer.

Remove the basil leaves from the stems and drop them into boiling water for 2 seconds to blanch. 

Transfer them immediately to an ice water bath.


Remove leaves from ice water bath and place them in a single layer on paper towels to drain. Gently pat dry completely using paper towel.


Place in freezer storage bag in single layers separated by parchment paper or wax paper and place in freezer.


It's nice to have basil leaves on hand to toss into recipes whenever we need them.  And, fresh basil tastes soooo much better than store-bought dried basil leaves.  

If you have an abundance of fresh garden items, consider freezing them - you'll love having them available when they're off season.   Enjoy!


Your comments are greatly appreciated and I look forward to your thoughts and ideas!  I try to respond to comments via email as soon as I can. If your email address isn't available, I will comment here. Thanks so much for visiting!


DIY & Natural Disposal Refreshers

Do you buy refresher tabs for the in-sink disposal in your kitchen?  Chances are, you have the ingredients on hand and ready to make these natural, great smelling two-ingredient citrus refreshers ...


Ingredients:
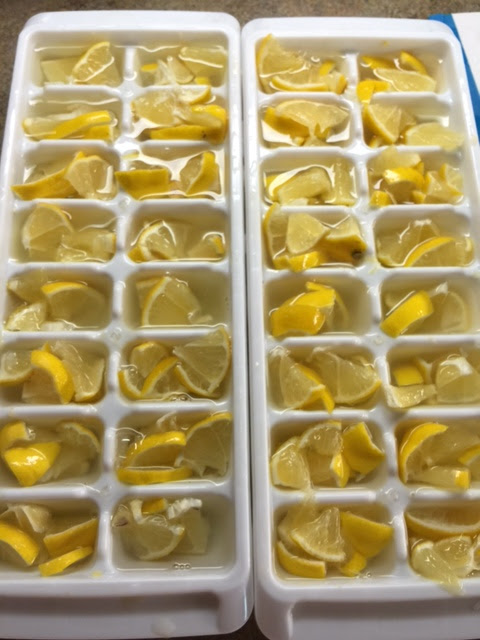
  • Fresh lemons, chopped
  • Distilled white vinegar
  • Ice cube trays


Making these couldn't be easier ....

Chop lemons (I removed seeds but it's probably not necessary).

Place lemon pieces in ice cube tray, packing them in tightly.  

Pour vinegar over lemons to fill each cube.  


Freeze.


Remove frozen lemon/vinegar cubes from trays and store in freezer in freezer bag.

And, that's it!  You now have frozen disposal refreshers that are ready to use any time you like.

Just pop one or two in your disposal with cold running water and turn on disposal to clean and deodorize.  The fresh lemony scent is wonderful and the frozen vinegar helps to keep the disposal blades sharp and clean.  


Before trying this lemon/vinegar combination, I also tried a homemade refresher containing baking soda, dish soap and salt with grated lemon peel.  


The tabs were adorable and smelled nice, but mine crumbled and fell apart before I even got them out of the storage jar. 

I much prefer the lemon/vinegar version - quick, easy and ready to use, even when you don't have fresh lemons on hand.  

And, because they're super frugal, I seem to use them more often than store-bought refreshers ...  which keeps our disposal smelling clean and fresh.


If you give them a try, I'd love to know how you like them!  Have you tried another version of disposal refreshers?  Which did you like best?


Your comments are greatly appreciated and I look forward to your thoughts and ideas!  I try to respond to comments via email as soon as I can. If your email address isn't available, I will comment here. Thanks so much for visiting!

Shared with:
 Nifty Thrifty Things
Julie's Lifestyle 
The Interior Frugalista
 Dear Creatives
 Create with Joy
DIY ShowOff
 The Chicken Chick
 Curly Crafty Mom
 Two Purple Couches
A Stroll Thru Life
The Dedicated House


Patriotic Chalk Art

A quick peek at our Patriotic Chalk Art sign for the festive lighted chalkboard easel ....


This started with a Silhouette Cameo cut file (link below) cut from Contact paper to use as a stencil, then filled in with colored chalk markers ... the same process used for the Father's Day Chalk Art and "It's a Good Day to Have a Good Day" chalkboard signs.  


I drew in a few freehand stars and side borders (lines and dots) to fill in blank space.


The colored chalk markers were really fun to use and the colors are bright.  These are the ones I used for this project:


Chalk Markers


The Silhouette cut file below can be found HERE:


Wishing you a Happy Fourth of July!


Your comments are greatly appreciated and I look forward to your thoughts and ideas!  I try to respond to comments via email as soon as I can. If your email address isn't available, I will comment here. Thanks so much for visiting!