Showing posts with label Furniture. Show all posts

DIY Wood Plank Lighted Headboard

Our recent foyer console table build provided motivation to create a wood plank lighted headboard for our guest room.


Materials used for queen size headboard:

  •  Four 1"x10" boards cut to 5' long
  •  Two 1"x4" boards cut to 37" long
  •  Brad nailer and 2" brads
  •  2" screws to attach support boards to wall studs
  •  Two wall lamps with wall plugs
  •  2-1/2" hole saw
  •  Two 1" wood screws (for mounting lamps to headboard)
  •  Level
  •  Wood stain
  •  Fine sandpaper


Four boards were found in our stash of scrap wood.  They were 1" x 10" and each had a totally different wood tone.  The shortest was actually a 1" piece of plywood (looked like a board to me!).  I was unsure if wood stain would unify these but took a chance that they would blend together once stained. 


LOTS of hand sanding and two coats of Minwax Dark Walnut stain resulted in a beautiful and smooth finish.  And, thankfully the stain looked even and uniform - or as close as possible.


For lighting, we searched Lowe's and Home Depot and looked in all departments - interior, exterior and utility lighting.  While there were lots of awesome options, many were too large.  

We selected two of these from Home Depot in brushed nickel:


http://www.homedepot.com/p/Hampton-Bay-5-1-in-Brushed-Nickel-LED-Spotlight-Desk-Lamp-19274-002/205749849?cm_mmc=shopping-_-bingpa-_-27-_-205749849&ci_src=328768002&ci_sku=205749849&gclid=CIny3MSry8wCFeSAMgodyjgCPg&gclsrc=ds
Hampton Bay Brushed Nickel Lamp


Hubby drilled holes in the top board and dropped each lamp's wall plug through the hole.  These would be hidden behind the headboard.  The lamps were attached to the top board with a 1" wood screw - each lamp had a predrilled hole in the back plate and these slipped easily and snugly onto the mounting screws.


We chose to attach the headboard directly to the wall and first installed two 37" 1x4's vertically, using 2" screws to attach them to wall studs.  


The stained boards were then attached horizontally to the support boards using a brad nailer and 2" brads.  For a more rustic look, you could use wood screws to attach the boards, but I wanted a sleeker look with no exposed screw or nail heads.

Even though the board below looks deceivingly slanted, it's all an illusion - it really is level.  


The finished dimensions are 5' wide x 37" tall.  It was tempting to add even more boards for a much taller headboard, but I wanted space above to hang a piece of metal art.


This was a fun project and I love how a few scrap boards can provide such impact and function in our guest room!   


Your comments are greatly appreciated and I look forward to your thoughts and ideas!  I try to respond to comments via email as soon as I can. If your email address isn't available, I will comment here. Thanks so much for visiting! 


Shared with:

Adding Craft Space Storage

Our combination guest room/craft space is a definite work in progress, but we're truly pleased with the changes we've made to date.

One handy addition is this white shelving unit:


It's the Kallax shelving unit from Ikea and it fits really well into this space.


Kallax from Ikea

It replaces this Leksvik bookcase (also from Ikea but no longer available) that was a little too wide.


Through the years, we've found Ikea pieces to be super sturdy and long lasting.  In fact, the Leksvik bookcase above is many years old and is still in perfect condition. 

Another positive is that Ikea items are easy to assemble - this came in very handy as I tackled this on a day hubby was out of town.

To my benefit, there was a nice booklet with illustrations for each step of the assembly, along with a bag of all hardware, wall anchoring brackets, and even an assembly tool - everything you need in one box.

 
Speaking of boxes, here's where I have to confess that the box was VERY HEAVY - it weighed 67#!  And, as fate would have it, it was still in the back of my SUV and hubby wasn't home when I decided to assemble it.

Being stubborn ... uh, rather ... being determined, I left it in the back of my vehicle, opened the box and brought the contents inside in manageable trips.  :)

That was honestly the most difficult step of the assembly - putting it together was a breeze.


Another impressive feature of the Kallax series is that the base, top and sides of the shelving unit are each approx. 1-1/2" thick.  


Before investing time in putting it together, I placed the base on the floor to ensure the size worked well and it did.


Above is a sneak peek at another new addition to the room - a DIY wood plank headboard - more on that soon!

A handy tip for using a rubber mallet is to cover the mallet head with a soft cloth (or in this case, an old sock!) to prevent damage or black marks on furniture pieces.  And you guessed  it - I learned this the hard way ... fortunately, marks were easily removed.


Following the instruction booklet, the shelving unit went together easily in about an hour.  


We really do like the crisp clean lines and it provides great options for craft storage and organizing.

Standard fabric storage cubes fit perfectly and are available at most home decor stores.  Or, Ikea offers drawer inserts and door options as well.  


Do you have any Ikea pieces in your home?  Are you as pleased with them as we are?  Have you been brave enough to attempt assembling any yourself?  :)


Your comments are greatly appreciated and I look forward to your thoughts and ideas!  I try to respond to comments via email as soon as I can. If your email address isn't available, I will comment here. Thanks so much for visiting!  


Shared with:

Shopping for a Craft Space

Setting up a craft space is a lot of fun, and checking out the many options available for seating and accessories is even more exciting!

Wanted to share with you a few fun things I discovered during a recent trip to Ikea and At Home that would be great for a craft space.


 (I was not compensated in any way for this post - 
the opinions expressed are my own based on my personal experience.)

My first stop was Ikea.  The above cart is a big hit on Pinterest and is available in dark gray, turquoise and beige.  It's the Ikea Raskog utility cart and is reasonably priced at $29.99.  The middle tray is even adjustable.  Isn't the turquoise cute?

The utility cart below is the Risatorp.  It's available in white, the baskets are generously sized and the bottom basket would be perfect for large sheets of card stock.  Wouldn't this also be a great portable cart for corralling all the supplies you need for a current project?


This is probably my favorite of all the items I saw ... it's the Pressa hanging dryer with 16 clips, and looks like an adorable chandelier.  It comes in white, red and black!  If I had a place to hang it, it would have come home with me.   I personally would use it for drying paint brushes, but envision it also for displaying cards and photos.


When I saw the Dignitet curtain wire (below), it struck me as being a neat way to display crafting scissors and tools - using ring clips.  


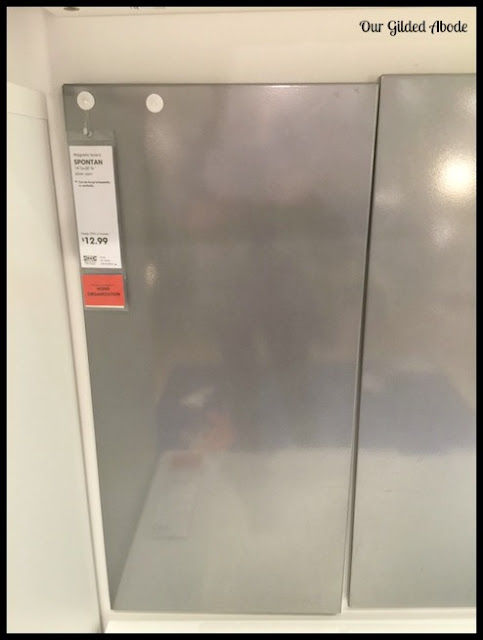
Next is the Spontan steel magnetic board.  It looks sleek and modern and is 14-1/2" x 20-3/4" - all for only $12.99.  A couple of these mounted side-by-side above a craft table would be awesome.


While at Ikea, I also checked out the chairs and stools.  

This one is the Roberget - it's metal and adjustable.  The turquoise color is so fresh and fun (it also comes in grey) - would look so cute in a craft space, along with the Raskog turquoise utility cart!


Another interesting seating option is this wicker adjustable chair.  It's the Gregor and available in white, light beige, and gray.  I may have to go back and get this one!


An item that did make the trip home with me was this Dalfred adjustable bar stool in black.  I really liked the way it looked in my craft space, but the height wasn't quite right, so returned it.  Am still searching for the perfect chair or stool.  


After leaving Ikea, I popped in At Home (formerly Garden Ridge) for a quick look at their many counter and bar stools.  The one below immediately caught my eye.  Unfortunately, as with the Ikea Dalfred stool above, the height was not quite right for my space.  But, the smooth brushed steel and sleek lines of the stool were very appealing.


Searching for craft space items that work well is just as much fun as actually acquiring them!  And, each time I visit Ikea and At Home, I find something new - such fun stores for browsing and gleaning ideas and inspiration. Do you have Ikea and At Home stores nearby?


Thank you to Tracy at At Home with Sweet T for featuring this post at Welcome Home Wednesdays!!! 


Your comments are greatly appreciated and I look forward to your thoughts and ideas!  I try to respond to comments via email as soon as I can. If your email address isn't available, I will comment here. Thanks so much for visiting! 


 Shared with:
(I was not compensated in any way for this post - 
the opinions expressed are my own based on my personal experience.)

Frugal Craft Space - File Cabinet Makeover

After years of having our kitchen island serve as my craft table, I am excitedly creating a craft space in our guest room where craft supplies and equipment can remain set up and ready to go!  I envisioned a large craft table supported by two 2-drawer file cabinets.  The cabinets provide great storage, but were less than attractive and desperately needed a makeover.


The first criteria for the new craft space was to be frugal and to use items we already had on hand whenever possible - basically, the same criteria for any project we undertake. No surprise there!


 Supplies:

Two metal 2-drawer file cabinets
Four decorative drawer pulls
Zinsser 123 Primer
Latex Paint
12 large wood paint stir sticks
Paint brush
Mitre saw box or hand saw 
Loctite Power Grab adhesive
220 grit sandpaper
Wood filler


We already had one file cabinet and located another of the exact same height at a local thrift store for only $15.  Along with being thrifty, an added bonus is that older metal file cabinets are made really well and provide sturdy and secure support for heavy tabletops.  


Gave them a quick cleaning and lightly sanded to rough the paint up and smooth any scratched areas.  

I also removed all the hardware on the front of the drawers because I wanted to add decorative drawer pulls and hopefully have the cabinets look more like furniture and less like industrial office equipment.

Hubby drilled holes for the decorative drawer pulls I bought at Hobby Lobby.  The four pulls cost a little over $8.

Next I painted the cabinets and drawer fronts with a coat of primer - Zinsser 1-2-3.  This stuff is amazing - is thick and goes on smoothly and evenly - great coverage.  I've used it on metals, wood and plastic with great results.  


This is where the project took a slight detour.  Instead of following my instinct and immediately framing out the drawers, I decided to try covering the drawers with birch paper.  Love the look of birch - it had to turn out great, right?  


Well ... it didn't look "bad," just not the look I was after in the space that I had envisioned.  Lesson learned!


To get back on track, I painted over the birch paper and let it dry. 

Then I grabbed our handy little mitre saw to cut the wood stir sticks to frame out the front of each drawer.  No fancy angled mitre cuts - just straight cuts.

Mitre Saw Box

The 5 gallon size wood stir sticks are surprisingly straight.  We had several, but not nearly enough to frame all the drawers.  Took a trip to the paint department at Lowe's and asked to buy 12 of them - did not expect them to just give that quantity to me at no cost.  Surprisingly, that's exactly what happened!  A pleasant surprise!

When all the wood pieces were cut, I adhered them to the drawer fronts using Loctite Power Grab adhesive.  This is another product that I use a lot for all types of materials.  It instantly adheres, but is repositionable for up to 15 minutes.  And, it comes in a convenient  resealable tube - so much easier than a bulky caulk gun.  No mess and no waste.


Loctite Power Grab


After letting the adhesive dry, I filled any gaps with wood filler, let dry and sanded.  Then it was finally time for paint!


I used a white interior latex satin paint from my stash - in Sherwin Williams Downy.  

And, the cabinets are now exactly as I had first envisioned - fresh and clean and ready to be filled with fun craft supplies.


Hope you enjoyed this little sneak peek at my new frugal craft space and I'll be back to share how we installed the table top, along with more of the "in progress" details!


Your comments are greatly appreciated and I look forward to your thoughts and ideas!  I try to respond to comments via email as soon as I can. If your email address isn't available, I will comment here. Thanks so much for visiting! 


 (I was not compensated in any way for this post - 
the opinions expressed are my own based on my personal experience.)


Shared with: