Showing posts with label Recipes. Show all posts

Big and Fluffy Belgian Waffles

We've always enjoyed waffles ... store-bought or homemade ... we like them all!  And when we saw a recommendation for a particular waffle maker, I took notice.  


Our waffle maker is over a decade old and quite fidgety.  It doesn't cook evenly, requires lots of oil or butter to keep from sticking, and takes forever to preheat.  And, did I mention that it's a nightmare to clean?

We ordered this Presto FlipSide Belgian Waffle Maker and it arrived today.  Of course, we had to try it out immediately. 


It comes with a few recipes and we made the Basic one .... flour, sugar, baking powder, eggs, oil, salt and milk.  That's it!


In a few short minutes, we were pouring a cup full of the batter onto the center of the preheated ceramic nonstick waffle grids (I call them plates). Close the lid and flip it 180 degrees to evenly coat the grids.  I really believe that's the secret ... evenly coating the cooking surface.  My waffle maker lacked the flip feature and waffles came out misshapen and quite wonky.  


After pouring the batter in, closing and flipping, and waiting 4 minutes (there's a built-in timer), they're ready.  Open the lid, remove the thick and nicely browned waffle that's crunchy on the outside and tenderly soft on the inside.

Layer on your favorite toppings - we like real butter with honey or maple syrup.  But, mixed berries and sliced bananas, or chocolate syrup and a dollop of whipped cream are really nice as well.


Thank you to Lana who commented on it at Blue House Journal!

I will certainly recommend this waffle maker to anyone and everyone!  If you have one or if you purchase this one, please let me know how you like it!  Bon appetite!


Hearty and Chunky Tomato Soup

With all the wonderful garden fresh veggies we've been gifted, we had a great supply of ripe tomatoes  We've been enjoying them on salads and as a side with sandwiches, but today we used them all for a super hearty tomato soup.  


We tend to make and eat dishes that sound appealing to us, regardless of the season, so hot soup isn't an unusual summer dish in our home.

To begin, I did my usual vinegar and water soak to remove any little critters that might be hiding out on the tomatoes and bell pepper, then rinsed thoroughly and removed the stems.   The tomatoes varied in size and I cut the largest ones in half and left the smaller ones whole - they'll break down while simmering.


I chopped 1/2 a large red onion, 1 green bell pepper, and a couple of Spring onions/scallions that I had on hand and needed to use up.   


In a large sauce pan I melted 3 tablespoons butter and 2 tablespoons olive oil.  Added the red onion, bell pepper and scallions and sauteed.  At this point I also added my seasonings and I vary them each time I make this.  Today I added Tone's Spicy Spaghetti Seasoning, garlic powder, black pepper and bone broth powder.


Added the tomatoes and stirred well.  


If you've not tried bone broth powder, it's awesome.  Adds great flavor to dishes and the little packets are so convenient.  Sourced from grass-fed, pasture-raised cattle, fresh vegetables, and herbs, spices, and seasonings  I like that it contains about half the sodium of beef bouillon. Great for those of us who don't have homemade bone broth on hand.  This is the one that I used:


Next I covered the saucepan with the lid and simmered, stirring frequently until the tomatoes were cooked through and the soup thickened.  I used my wooden spoon to mash them for instant thickening.  

After picking fresh basil, oregano and rosemary from our plants, I chopped them and added to the soup along with an 8 oz can of tomato sauce.  


Here's where I'll admit that we love a nice warm slice of buttered homemade bread with our soup so I started a loaf in the bread machine.  :)


This soup contains such simple and basic ingredients but honestly tastes so rich and hearty that you'd think it surely is complicated to make.  The onions and bell pepper provide a nice chunky texture to the smoothness of the tomatoes.  And the bone broth and fresh herbs are so flavorful!  Our favorite kind of dish!  

 Your comments are greatly appreciated and I look forward to your thoughts and ideas!  
I try to respond to comments via email as soon as I can.  
If your email address isn't available, I will comment here.  
Thanks so much for visiting ... God bless you and have a beautifully creative day!


Shared with:

Baked Eggplant Parmesan

We were recently gifted three beautiful garden fresh eggplants from a friend's garden and I couldn't wait to treat us to Eggplant Parmesan.  It's a favorite of ours when we eat out and we were hoping for a tasty non-fried version.  This one did not disappoint!


The fresh eggplant were absolutely gorgeous and just ripe.  (Note:  The white squash below were not used in this recipe.)


To begin, I preheated our oven to 375 degrees.  I washed the eggplant thoroughly and cut unpeeled into 1/4" slices.  Next I dredged them in eggs (3 beaten eggs) and store bought Italian seasoned Panko bread crumbs (2 cups), using two shallow glass containers.  Dipped the slices first in egg then in the bread crumbs, coating well.


Placed the breaded eggplant slices on parchment paper (I sprayed lightly with cooking oil) on a baking sheet and baked until slightly brown.  In my oven, baking time was 10 minutes on each side.  You don't want them overly browned because they'll go back in the oven for more baking in the next step.


Remove from oven.


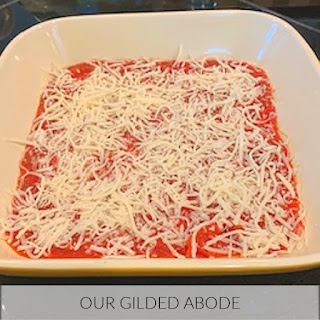
In a large casserole dish sprayed with cooking oil, I added a layer of pasta sauce and covered with shredded mozzarella.


Placed the baked eggplant slices in the dish in rows.


And top with more pasta sauce, mozzarella, parmesan, and fresh chopped basil.


Bake 20-25 minutes or until pasta sauce is hot and eggplant is heated through.  Below I had added remaining pasta sauce I had on hand after baking - heated it through in a saucepan and spooned it over the baked eggplant.


Remove and let sit for 5 minutes.  Serve plated with crusty garlic bread, a nice side salad and, if you like, a serving of pasta.


This dish was so tasty!  We love the combination of the slightly crunchy exterior of the eggplant with the tender center.  It was every bit as good - maybe even better - than the fried version.  We'll definitely make this one again.  Enjoy!

Your comments are greatly appreciated and I look forward to your thoughts and ideas!  
I try to respond to comments via email as soon as I can.  
If your email address isn't available, I will comment here.  
Thanks so much for visiting ... God bless you and have a beautifully creative day!


Meyer Lemon Blender Pie

Looking for a good and super easy lemon pie recipe?  We had this one on Christmas Day and really enjoyed it. It’s so simple and yet very tasty.  And, you use an entire Meyer lemon ... peel and all.  Just remove seeds and place all ingredients into a blender.  Thank you to my friend, Dannie, for sharing the recipe!


Classic Pizzelle Cookies

A few years ago we started a new family tradition - making homemade pizzelles for the holidays.  These thin, crisp and crunchy sweet cookies are so tasty!


Pizzelles are Italian cookies made with a press that looks very similar to a waffle iron.  The plates are decorative and give the cookies an embossed appearance.  They can be served flat, or while warm, can be rolled and filled to make cannoli.


There are many pizzelle press styles available and for many families, the well loved press is a treasured heirloom passed down through the generations.

My press is a Cuisinart model WM-PZ2 and I'm very pleased with it.  It heats evenly and the nonstick plates are a breeze to clean with a damp paper towel.


This recipe comes from a very old church fundraiser cookbook.  I can't recall the name of the cookbook, but the recipe is for basic pizzelles.


Classic Pizzelles


1-3/4 cups all-purpose flour
2 teaspoons baking powder
3 large eggs, beaten
3/4 cup sugar
1/2 cup unsalted butter, melted
1 tablespoon vanilla extract or anise

Plug in the press to heat while preparing the batter - on Setting 3.

In a small bowl, mix and set aside the flour and baking powder.

In a medium bowl, mix eggs and sugar with a mixer on medium speed for 1 minute.  

On low speed, add melted butter and vanilla or anise extract (not both!), just until blended - about 15 seconds.

Slowly add flour mixture and mix until combined, about 15 seconds.  Do not over mix.

Spray press plates with cooking oil.

Drop 2 teaspoons of batter onto center of each press plate.  


Close the lid and lock.  Red indicator light will be on.

When red light goes off and green indicator light comes on, open lid and carefully remove pizzelles using a heatproof plastic spatula.


Place pizzelles on a cooling rack to cool completely.

NOTE:  Adjust the press setting to a higher number for darker pizzelles, or to a lower number for lighter pizzelles.  Our family likes dark cookies so I make them on Setting 5.

Or, while warm, wrap pizzelle around a dowel to form cannoli shells.

There are many recipe variations as well - for chocolate pizzelles, cocoa can be added to the batter.  For marble pizzelle, add 2 ounces of chopped chocolate to the batter.  

SAFETY TIP - the pizzelle press cannot be left unattended - the batter cooks very quickly and therefore, can burn very quickly.  If you find you need to leave them unattended, unplug the press.

These are a great treat to have on hand when you'd like a sweet but light snack - awesome with a hot cup of coffee or tea following a generous holiday meal!  


Have you made pizzelles?  Or, eaten homemade or store-bought versions?  Do you like them? 


Your comments are greatly appreciated and I look forward to your thoughts and ideas!  I try to respond to comments via email as soon as I can. If your email address isn't available, I will comment here. Thanks so much for visiting!

Shared with:

Deep Dish Pecan Pie

Our family members each have a favorite cake or dessert for birthdays and special occasions, but one universal favorite is a rich, gooey pecan pie.


Truth be told, in the past I've tiptoed around the idea of making a homemade pecan pie.  I've bought them at local bakeries, and even avoided pie baking altogether by distracting my family with pecan crisps and pecan cobblers.  

But, it was time to face my fear of pecan pie baking failure ... and to finally use my springform pan.  To better our odds of a favorable outcome, used store-bought pie crust.  

To get started, preheat oven to 325 degrees.

The ingredients are:

4 cups chopped pecans
1 cup honey (you could use corn syrup)
1 cup brown sugar - I used dark
3 whole eggs
3 egg yolks
1 teaspoon vanilla extract
6 tablespoons melted unsalted butter
2 tablespoons all-purpose flour
2 refrigerated pie crusts

Roll out one refrigerated pie crust.  Cut into 4 equal pieces.  Place the 4 pie crust pieces along the outside edges of the second full pie crust, pressing the edges to form a large circle.  I did this to create a thicker edged crust that you'll see in a bit.


Carefully place crust in springform pan sprayed with nonstick cooking spray.


Roll the excess crust in and press against the inside sides of the pan.


To prevent the crust from rising in the center as it bakes, prick the bottom of the crust.  I wrapped the pan with aluminum foil as a precaution, but fortunately found the pie did not overflow while baking and the pan did not leak.


Set aside the 4 cups of chopped pecans.  In a bowl, mix all other ingredients.  Stir in the pecans.


Pour mixture into pie crust. 


Place in middle rack in oven and bake for 1 hour.


Let cool and remove side of springform pan.  Slice and serve with a generous scoop of vanilla ice cream. 

We enjoyed this pie recently when we celebrated our baby boy's birthday - he's 34!  :) 


Your comments are greatly appreciated and I look forward to your thoughts and ideas!  I try to respond to comments via email as soon as I can. If your email address isn't available, I will comment here. Thanks so much for visiting!


Shared with:

Decadent Chocolate Mug Cake

Have you tried any of the quick chocolate mug cakes that are super easy to make?  You mix all ingredients in a mug and after about 3 minutes in the microwave, you have a yummy single serving of moist chocolate cake!


I've tried several versions and after a few tweaks, this is by far my favorite.

In a large microwave safe mug, mix the following:


  • 4 tablespoons sugar
  • 4 tablespoons all purpose flour
  • 2 tablespoons cocoa powder
  • 1/8 teaspoon salt
  • 1/8 teaspoon baking powder
  • 1 large beaten egg
  • 3 tablespoons heavy cream (milk can be used)
  • 3 drops vanilla
  • 3 tablespoons oil
  • 1 tablespoon Nutella Hazelnut Spread

Mix all ingredients thoroughly.  Microwave 2-1/2 to 3 minutes.  Remove carefully from microwave.  Cake will be super hot.  Let cool a few minutes and serve warm.  

You can eat directly from the mug, or turn it out to a pretty dessert plate and serve with a topping of whipped cream and chocolate syrup.  

These are great when you're the only chocoholic in the house and don't want to bake a full-size cake (at risk of solely eating the entire cake!)  or when you just want a chocolatey quick snack.


If you give this recipe a try, I'd love to hear how you like it!


Have you tried a chocolate mug cake recipe that you're really fond of?  Tried any other flavors?  Please share!


Your comments are greatly appreciated and I look forward to your thoughts and ideas!  I try to respond to comments via email as soon as I can. If your email address isn't available, I will comment here. Thanks so much for visiting!

Shared with: