Showing posts with label Fall. Show all posts

Thanksgiving Tablescape


Plans for Thanksgiving Day are moving right along!  So excited that our grand kiddos will be spending the day with us!  All the kiddos will be home except for our youngest son who is vacationing overseas at the moment.  We'll sure miss him but he's having a great trip and we're thrilled for him.

This year we cheated a bit and are having our main meal catered.  I only need to make a few appetizers and desserts.  It's been a wonderful break. The caterer will be providing our baked turkey with all the trimmings and sides.  We did this a few years ago as well and the food was every bit as good as home cooked.  A plus is that the turkey is already carved - boneless and sliced except for the legs.  Easy peasy!

Our tablescape is super simple - leaving plenty of room for serving dishes and platters when we remove the centerpiece.  Found these cute Thanksgiving wheels for the littles to color and draw.  And a couple of Thanksgiving Berenstain Bears books will be fun.   Made raspberry bars and oatmeal cookies today and will make brownies tomorrow.  Ordered a pumpkin pecan pie from a local bakery. We’ll miss several family members who won't be with us but we're looking forward to Thursday!




Our Fun Thanksgiving Table

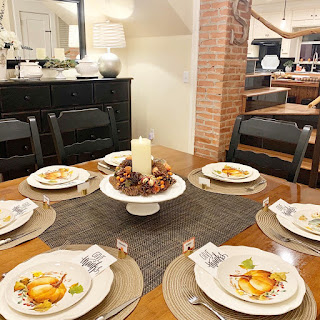
There's nothing like waiting until the very last minute to plan your holiday tablescape.  I'm not quite sure why I procrastinated, but today I finally got it done.  And I only wish I'd started sooner because creating the personalized place setting decor for our little grandsons was so much fun!


It was quick and easy using a gold charger that I spray painted.  You can find more details HERE.


I placed the colorful plate and matching napkin (disposable) in the center of the charger and wrapped the silverware in the napkin and tied with natural raffia.

For the decorative dots, in Microsoft Publisher (you can also use Word), I created orange circles (using "Shapes") with centered white lettering, printed, and cut out using a circle punch.  For the small round turkeys on white background, I simply found a free printable that I liked, resized it and printed multiples on white paper.  Then, cut into circles using my circle punch.  I used a glue stick to attach the decorative circles to the chargers.

For added fun, I placed these cute tote bags on the back of the little ones' chairs - they're filled with puzzles, stickers and books.  I wish they were orange, but my choices were green and pink.  To continue the colorful turkey theme, I cut out the turkey from the paper napkins and decoupaged them to each tote.  We hope the little guys like them.  


Kiddos really do make the holidays colorful and fun!  


The adult place settings aren't nearly as fun and whimsical, but they're in keeping with the colors of the season. 


A simple setting with a Fall charger as a base, white dinner plate, amber toned stoneware salad plate, dinner napkin, and raffia tied silverware. Added water and wine stemware glasses and called it done!

Our centerpiece is a clear glass cloche on a weathered round tray, filled with pinecones, encircled in a Fall berry garland and Fall table scatter.  


I've probably broken every formal etiquette table setting rule, but this hodge podge style works well for us.  We're looking so forward to enjoying a bountiful meal with those we love!

If you'd like to see more of our Thanksgiving decor, you can find it HERE.


Wishing you and yours a happy and joyful Thanksgiving!


Your comments are greatly appreciated and I look forward to your thoughts and ideas!  I try to respond to comments via email as soon as I can. If your email address isn't available, I will comment here. Thanks so much for visiting!

Shared with:
 

2016 Fall Decor in Our Abode

This year, we were gifted with pinecones galore for our Fall decor.  


We don't have pine trees in our lawn, but my sweet sis-in-law, who lives in Maryland, has an abundance of beautiful long pinecones and she was so gracious to gather them, pack them in a box and send them to me in Texas.  

I've scattered them throughout our home.  They add the perfect touch for Fall and are a sweet reminder of her across the miles.

For the mantel, I created a glitzy pinecone garland using the pinecones and some awesome gold cascading garland.  I was smitten with this gold garland at Hobby Lobby last year but didn't buy it - so was thrilled when I found it again a few weeks ago.  It adds subtle shimmer and shine, don't you agree?


To make the pinecone garland, I securely tied (the pinecones can be heavy!) a length of jute twine to each corner of the fireplace mantel, meeting in the center.  Then, I looped a small length of the twine thru the top of each pinecone and tied them individually to the jute garland.  Super quick and easy to arrange each pinecone by sliding them along the garland.  

Here's a shot without the gold cascading garland added:


I'm honestly so excited about decorating for Christmas this year that most of the Fall decor I'm using are repeats from last year.  But, we're enjoying them just the same.  :)

I'll stop (most of) the chatter now and let the pics speak for themselves:


The Fall printable above is available for purchase from Ann Drake and can be found at Life ... On Sutton Place.  


The above wreath printable is a free printable from Ann Drake at Life ...On Sutton Place.  I had been searching for a "Welcome Fall" wreath printable and loved Ann's and simply replaced her original "Gather" text in the center using Picmonkey.  Thanks to Ann for providing us with all the lovely printables - be sure to check them out on her site HERE.


Don't these cotton boll stems look realistic?  Well ... that's because they ARE!   When it comes to acquiring decor supplies, I am totally without shame and have no scruples whatsoever.  :)  While traveling a back country road recently, I had the good fortune of following a cotton trailer that was dropping cotton stems from its undercarriage.  Guess you can see where this is headed.  LOL!  One minute they're road kill and the next they're gracing our dining room for Fall.  


That wraps up our Fall decor tour.  Wishing you and yours a nice Thanksgiving Day abundant with good food, family and friends and many blessings!


Your comments are greatly appreciated and I look forward to your thoughts and ideas!  I try to respond to comments via email as soon as I can. If your email address isn't available, I will comment here. Thanks so much for visiting!

Shared with:
 

Free Printable - Fall Themed Christmas Countdown

Each year at this time I'm excited to display our festive red framed Christmas countdown printable in our kitchen.  But, this year I also wanted a Fall themed countdown.  


Using Picmonkey I was able to create a reusable countdown that can be displayed through Thanksgiving.  It's nice to have a reminder of how much time we have until Christmas, without neglecting the Fall season and Thanksgiving.

And, I'm happy to share the free printable with you.  It's formatted for an 8"x10" frame or mat.  Just print, frame and use a dry erase marker on the outside of glass to write in the number of days until Christmas.


To download and print, click HERE.

If you have any problems downloading, please email me or leave a comment with your email address and I will forward the file to you.

You can find the number of days until Christmas HERE.


Your comments are greatly appreciated and I look forward to your thoughts and ideas!  I try to respond to comments via email as soon as I can. If your email address isn't available, I will comment here. Thanks so much for visiting!


Shared with:

Thanksgiving Tablescape

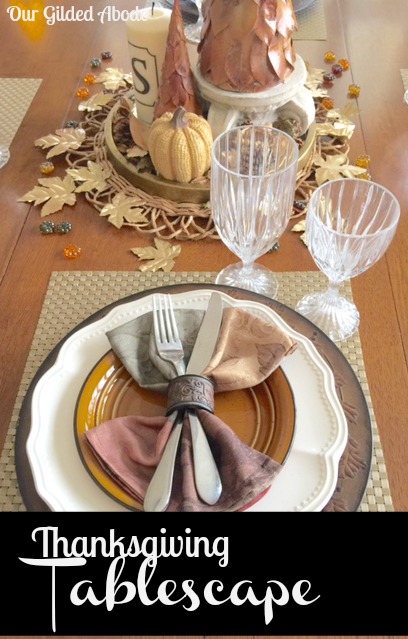
Can you believe Thanksgiving is just a little over a week away?  To jolt myself into that realization, I took some time to play with tablescape options for Thanksgiving Day.  


It's a lot of fun to mix patterns, textures and color combinations using placemats, napkins, napkin rings and dishes.  And, it's all about personal preference - there's no right or wrong way to do it (in my opinion) - just find a combination that appeals to you.


For this tablescape, I set the table with four place settings, but will add more for our Thanksgiving meal.


I started with a square woven goldtone placemat as my foundation.  They were purchased at Kohl's.  Topping the placemat was a dark Fall charger with embossed leaves, for a definite touch of Thanksgiving.  For more on these chargers, see my previous post HERE.

Next I added a white stoneware dinner plate.  This basic white dinnerware set is so versatile and has been a great buy - it can be paired with most any color combination for any occasion.  It is Red Vanilla Classic White stoneware from Overstock.  You can find it HERE.

The salad plate is from an amber stoneware set that I bought years ago.  It's our favorite everyday set.  Unfortunately, it's no longer available but a somewhat similar (in color) set is available HERE.

The dinner napkins are Mainstays Tuscany napkins and are a wonderful combination of neutral tones mixed with deeper autumn colors.  They can be found HERE.  I folded them accordion style and slipped them thru the napkin rings. The flatware is tucked into the napkins and napkin rings - simple and easy.

The woodtone napkin rings with embossed autumn leaves coordinate nicely with the chargers and are available HERE.

Last but not least in the place setting, the beverage and wine glasses are near and dear to me.  They are Mikasa Park Lane and now discontinued.  


Now for the center of the table ...


The centerpiece is comprised (of course!) of items on hand.  Starting at the very bottom, the base is a round rattan placemat with delicate scalloped edges.  Am loving the rustic touch!  Found them at Pier 1 a few years ago.  They are great to use throughout the home.

On top of the rattan placemat is a gold framed round mirror repurposed as a tabletop tray. Bought the mirror from Target, but am not finding it online.  Most mirrors can be used as trays - just be sure to add felt to the underside to protect your tabletop.  


You may recall the natural leaf cone tree from my post HERE.  It has surprisingly maintained its rusty brown leaf tones, which is perfect for Fall and Thanksgiving!  The large leaf tree was placed on a pedestal and is surrounded by a smaller leaf tree and a monogram candle made by printing the monogram on tissue paper and decoupaging to a white pillar candle.  You can find my tutorial on the tissue paper/decoupaging process HERE.

Also tucked into the vignette is a cute little faux burlap earthtone pumpkin found at Dollar Tree.  Amazing texture and detail for an item that costs only $1!

For additional texture, around the mirror base I added assorted earthtone potpourri consisting of natural elements - miniature pinecones, leaves and seed pods.


The faux gold leaves scattered around the vignette were actually vibrant reddish orange when I bought them at Dollar Tree.  To tone them down a bit and add some bling, I spray painted them with gold paint.  The gold is a much better suited color in this tablescape and works well with the goldtone square placemats.


A package of Fall table scatter in shades of gold, orange and brown, was placed around the perimeter of the mirror tray.  Very inexpensive and adds a fun touch!

Realistically, just before we sit down for our meal, we remove the centerpiece.  This one will be easy to move to make room for tasty goodies!


Wishing you and yours a wonderful Thanksgiving Day!  Thanks a bunch for joining me on this tour of our dining room tablescape!  


Shared with:

Fun & Glitzy Holiday Pumpkin

Decorating pumpkins is such fun!  They're like round blank canvases ... ready and willing to be painted, covered and embellished in virtually any materials we impose on them.  


Materials used:

(Click on individual items below for additional info)


This beast is huge - at 30# and a diameter of 50", it's a LARGE canvas!   Hubby brought it home to me after a recent trip to Sam's Club.  He jostled it into the house, stating that it just looked like something I should have!   :)

My goal was to create a design that was not occasion specific and would be appropriate to display thru all the Fall/Winter holidays.  

Last year, I painted our Fall pumpkin with black chalkboard paint and it lasted for months and months - thru Fall, Christmas and into the following year.  It reached a point where we kept it just to see how long it would last - it turned into a personal challenge between us and "the pumpkin." LOL!  

Finally, in May we gave in and and tossed it.  The pumpkin had won - it was still intact and showed no signs of deteriorating.  


The first step to tackling this year's beast was to paint it with two coats of primer (Zinsser's Bulls Eye 1-2-3 White water based primer/sealer for all surfaces is my favorite).  Left the stem natural. I liked the primer so much that I didn't add a layer of regular paint over the white primer.

Next I used a stencil and a pencil to transfer a frame design to the pumpkin. 


Filled in the frame design with a black permanent marker and used gold metallic craft paint and a soft artist's brush to paint the natural and somewhat uneven stripes of the pumpkin along the deep ridges.  Did you know the ridges are actually called "ribs?"   

Then I filled the center of the frame design with gold/white patterned tissue paper.  Used the stencil and pencil again to transfer the inside of the frame design to the patterned tissue paper.  Cut it out with scissors and decoupaged to the pumpkin with regular white glue.


At this point, I really wanted to add gold dots in vertical rows, but knew it would take FOREVER to stencil or even dab paint dots on this beast.  

Fortunately, I found tissue paper in my stash that worked perfectly - white tissue with rows of shiny gold dots!  I cut long strips of single dots and decoupaged them to the pumpkin.  

Perfectly aligned rows of shiny gold dots - much better than I would have been able to do by painting.  Love when an "unplanned" plan comes together!  :)


For the monogram, I could have used my handy dandy Silhouette Cameo cutter, but this was such a simple monogram that I made my own quick stencil by printing the "S" on my laser printer, and cutting it out manually with scissors (old school!).   


After tracing the "S" onto the reverse side of the black contact paper, I manually cut the monogram out and attached it to the center of the frame design.


The last step was to use a scallop circle paper punch to create two scalloped circles to place on each side of the monogram.

One last tip:  I've used all types of craft glues and, have found that with many projects, just plain old white glue (the kind that you used in kindergarten) from the dollar store works just as well.  


And, that's it!  Such fun to let projects like this just evolve and change as you work your way through them.  Have you decorated your holiday pumpkin, or do you prefer carving?  Have a great day and I hope that you are experiencing Fall-ness in your area!